
Eureka는 디스커버리 서비스,
Spring Cloud Gateway는 API 게이트웨이 서비스로 LoadBalancer 기능을 한다.
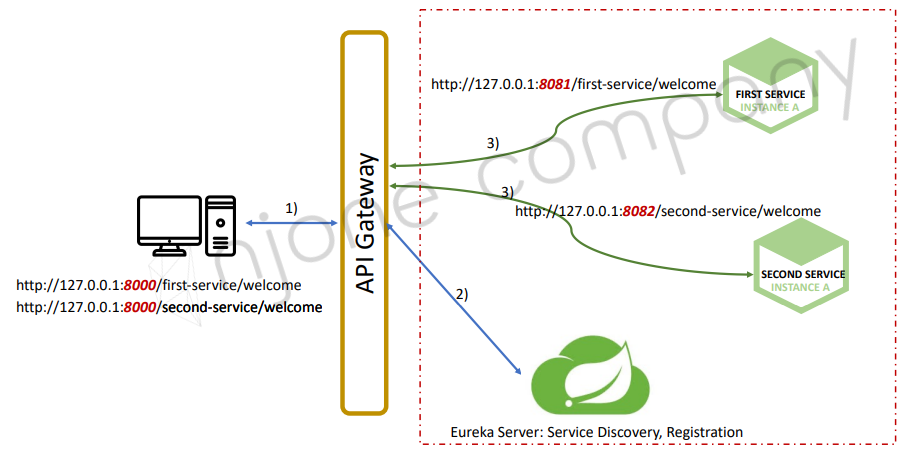
즉, 클라이언트가 8000포트의 API Gateway로 요청을 보내면, API Gateway는 유레카로부터 마이크로서비스가 어디에 위치해있는지 정보를 가져온다. 그 뒤에 해당하는 정보로 직접 포워딩시켜준다.
따라서 클라이언트 요청 -> API Gateway -> Eureka -> API Gateway -> MicroService의 순서가 된다.
1.API Gateway 서비스 설정하기
유레카 설정이 필요하다.
application.yml
eureka:
  client:
    register-with-eureka: true
    fetch-registry: true
    service-url:
      defaultZone: http://localhost:8761/eureka


spring:
  application:
    name: apigateway-service
  cloud:
    gateway:
      default-filters:
        - name: GlobalFilter
          args:
            baseMessage: Spring Cloud Gateway Global Filter
            preLogger: true
            postLogger: true
      routes:
        - id: first-service
          uri: lb://FIRST-SERVICE
          predicates:
            - Path=/first-service/*
          filters:
            - CustomFilter
        - id: second-service
          uri: lb://SECOND-SERVICE
          predicates:
            - Path=/second-service/**
          filters:
            - CustomFilter
            - name: LoggingFilter
              args:
                baseMessage: Hi, there.
                preLogger: true
                postLogger: true
routes 설정의 uri가 lb://FIRST-SERVICE로 되어있는 것은 (lb:loadbalancer=디스커버리서비스의 네이밍서비스를 이용하겠다 = 디스커버리 서비스 안에 포함되어있는 인스턴스 이름을 찾겠다) eureka서버에 FIRST-SERVICE라는 이름을 가진 인스턴스로 연결해준다는 의미이다.

localhost:8000/first-service/welcome 등의 호출을 하게되면, eureka에서 정보를 얻어와서 설정할 수 있다.
참고> 랜덤포트로 스프링부트 인스턴스를 띄우는 방법
application.yml
server:
  port: 0

spring:
  application:
    name: first-service

eureka:
  client:
    register-with-eureka: true
    fetch-registry: true
    service-url:
      defaultZone: http://localhost:8761/eureka
  instance:
    instance-id: ${spring.application.name}:${spring.application.instance_id:${random.value}}
    prefer-ip-address: true
ip-address: 127.0.0.1port를 0으로 지정하면 포트번호가 랜덤으로 지정된다. (계속 인스턴스를 줄이거나 늘릴 수 있음)
그런데 이렇게 될 경우 인스턴스를 여러개 띄우더라도 유레카 서비스에서는 0번 포트인 것 하나만 노출하게 된다.
따라서 instance-id를 지정해주어야한다.
prefer-ip-address 등의 설정은 현재 회사 내부망을 쓰고 있어서 DNS 설정이 되어있어 따로 설정해둔것
이 때, 동작하는 first-service와 second-service 인스턴스가 여러개라면?
roundaway 방식에 의해 인스턴스를 번갈아가면서 호출하게된다.
즉, Spring cloud gateway를 사용하게 되면 간단한 라우팅 기능과 로드밸런스 기능까지 사용할 수 있다.
'백엔드 Backend > 서버 Server' 카테고리의 다른 글
| Spring Cloud Config 자동으로 반영하기 (feat. Acturator) (0) | 2025.01.14 |
|---|---|
| Spring Cloud Config - 분산 시스템 설정 관리 (3) | 2025.01.14 |
| API 게이트웨이 서비스 - (2) Spring Cloud Gateway (0) | 2025.01.06 |
| API 게이트웨이 서비스 - (1) Netfilx Zuul (1) | 2025.01.06 |
| Spring Boot 프로젝트를 Docker 이미지로 빌드하기 (1) | 2024.08.02 |
Eureka는 디스커버리 서비스,
Spring Cloud Gateway는 API 게이트웨이 서비스로 LoadBalancer 기능을 한다.
즉, 클라이언트가 8000포트의 API Gateway로 요청을 보내면, API Gateway는 유레카로부터 마이크로서비스가 어디에 위치해있는지 정보를 가져온다. 그 뒤에 해당하는 정보로 직접 포워딩시켜준다.
따라서 클라이언트 요청 -> API Gateway -> Eureka -> API Gateway -> MicroService의 순서가 된다.
1.API Gateway 서비스 설정하기
유레카 설정이 필요하다.
application.yml
eureka:
  client:
    register-with-eureka: true
    fetch-registry: true
    service-url:
      defaultZone: http://localhost:8761/eureka


spring:
  application:
    name: apigateway-service
  cloud:
    gateway:
      default-filters:
        - name: GlobalFilter
          args:
            baseMessage: Spring Cloud Gateway Global Filter
            preLogger: true
            postLogger: true
      routes:
        - id: first-service
          uri: lb://FIRST-SERVICE
          predicates:
            - Path=/first-service/*
          filters:
            - CustomFilter
        - id: second-service
          uri: lb://SECOND-SERVICE
          predicates:
            - Path=/second-service/**
          filters:
            - CustomFilter
            - name: LoggingFilter
              args:
                baseMessage: Hi, there.
                preLogger: true
                postLogger: true
routes 설정의 uri가 lb://FIRST-SERVICE로 되어있는 것은 (lb:loadbalancer=디스커버리서비스의 네이밍서비스를 이용하겠다 = 디스커버리 서비스 안에 포함되어있는 인스턴스 이름을 찾겠다) eureka서버에 FIRST-SERVICE라는 이름을 가진 인스턴스로 연결해준다는 의미이다.
localhost:8000/first-service/welcome 등의 호출을 하게되면, eureka에서 정보를 얻어와서 설정할 수 있다.
참고> 랜덤포트로 스프링부트 인스턴스를 띄우는 방법
application.yml
server:
  port: 0

spring:
  application:
    name: first-service

eureka:
  client:
    register-with-eureka: true
    fetch-registry: true
    service-url:
      defaultZone: http://localhost:8761/eureka
  instance:
    instance-id: ${spring.application.name}:${spring.application.instance_id:${random.value}}
    prefer-ip-address: true
    ip-address: 127.0.0.1
port를 0으로 지정하면 포트번호가 랜덤으로 지정된다. (계속 인스턴스를 줄이거나 늘릴 수 있음)
그런데 이렇게 될 경우 인스턴스를 여러개 띄우더라도 유레카 서비스에서는 0번 포트인 것 하나만 노출하게 된다.
따라서 instance-id를 지정해주어야한다.
prefer-ip-address 등의 설정은 현재 회사 내부망을 쓰고 있어서 DNS 설정이 되어있어 따로 설정해둔것
이 때, 동작하는 first-service와 second-service 인스턴스가 여러개라면?
roundaway 방식에 의해 인스턴스를 번갈아가면서 호출하게된다.
즉, Spring cloud gateway를 사용하게 되면 간단한 라우팅 기능과 로드밸런스 기능까지 사용할 수 있다.
'백엔드 Backend > 서버 Server' 카테고리의 다른 글
| Spring Cloud Config 자동으로 반영하기 (feat. Acturator) (0) | 2025.01.14 |
|---|---|
| Spring Cloud Config - 분산 시스템 설정 관리 (3) | 2025.01.14 |
| API 게이트웨이 서비스 - (2) Spring Cloud Gateway (0) | 2025.01.06 |
| API 게이트웨이 서비스 - (1) Netfilx Zuul (1) | 2025.01.06 |
| Spring Boot 프로젝트를 Docker 이미지로 빌드하기 (1) | 2024.08.02 |